Enrollment
Overview
Features of the Enrollment Tool
Here are a few highlights of the Enrollment Tool:
Custom ID - You can assign your Custom ID to any Billing Provider, Billing Provider NPI/site or Rendering Provider using a Custom ID. Your Custom ID can be used for all searches in the Revenue Performance Enrollment system. In other words your Custom ID can be used instead of all the other Billing Provider or Rendering Provider IDs.
Revenue Performance and Custom Payer lists- Payer Lists offers Revenue Performance complete payer list and the ability to use our list to create multiple custom payer lists as needed.
Three ways to start Enrollment - The enrollment workflow has been simplified and can be started by selecting a Billing Provider/Rendering Provider or a Payer. Or you can select an existing enrollment and just make a copy. This means most of the work has already been completed.
Set Up Steps
These set-up sections are used to support your workflow by configuring your user settings and by populating the enrollment tool with your provider and payer information.
Settings
Enrollment Contact Information - Populate this section with your enrollment contacts
User Settings- In User Settings assign user "rights" to your team members.
Payer List
The Payer list has been updated to offer these two options:
- View the Revenue Performance payer list
- From the Revenue Performance payer list the user can create one or more custom Payer lists.
- Payer lists can be made to match the needs of a user, an office, or a client location
Provider Management
Provider Management or Bulk Upload - Add providers manually or use the Bulk Provider spreadsheet
Settings
Enrollment Contacts
Designate and view your contacts for Claims, ERAs, and Real Time.
Larger organizations may have a contact for each transaction type.
Each account must have at least one enrollment contact.
- Enter contact information and Save
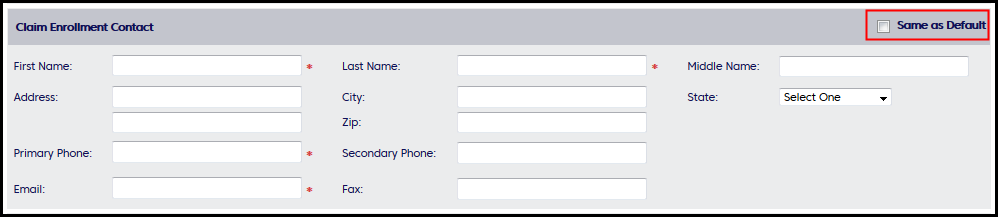
- Uncheck Same as Default to enter other enrollment contacts
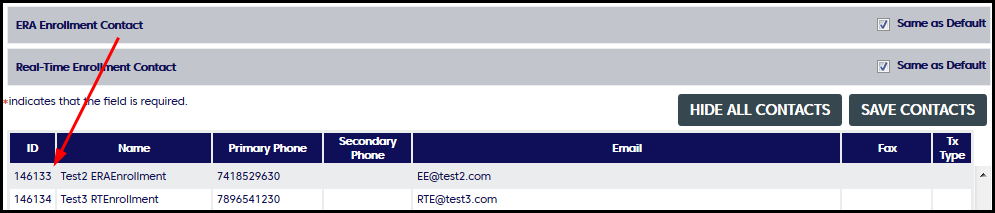
- Click on View All Contacts to see existing contacts
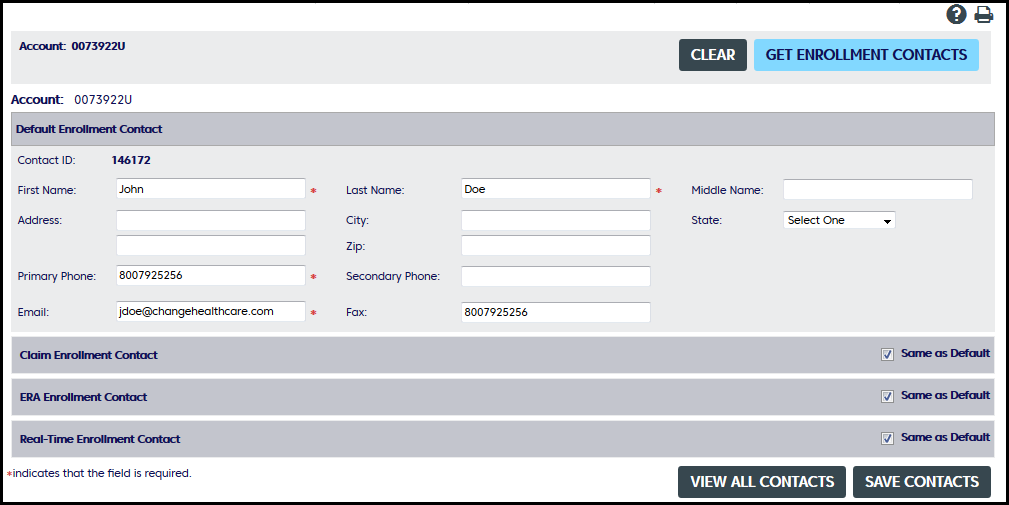
When Same as Default is unchecked it opens the entry fields for other enrollment contacts.
From View All Contacts all existing contacts are listed.
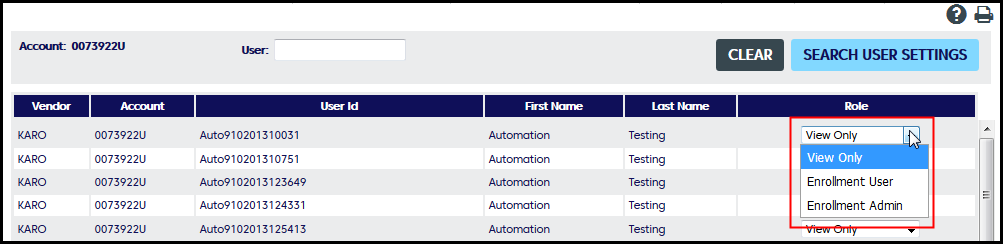
User Settings
Enrollment Administrators can assign user-rights from this page.
- View Only - User can only view enrollment information.
- Enrollment User - User can access and use all enrollment functions except Administrator tasks.
- Enrollment Admin - User can access and use all enrollment functions including Administrator tasks.
- Administrator tasks include ability to change user roles an assign enrollments to users
- Conf. Msg. (Confirmation Message) - If checked this user will see confirmation messages when they use some Enrollment functions
Revenue Performance Payer List
The Payer list includes Revenue Performance payer list with the ability to use that list to create and edit multiple custom payer lists.
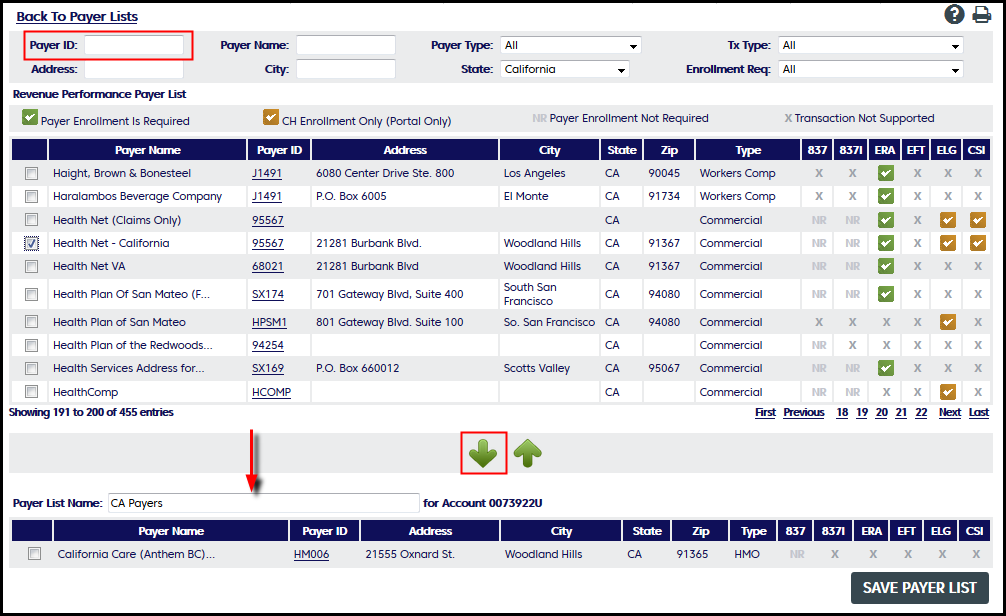
Create Custom Payer Lists
The Revenue Performance Payer List - all available payers - appear in the top list.
- To locate a payer use the entry fields - Payer ID, Payer Name, Payer Type, etc. - and the list will scroll to the matching payer.
- Check the payer to add to your custom list
- Use the arrows to add to your list or to remove payers from your selected list.
- In this example we are adding MC051 to custom payer list CA Payers - see red arrow. Click Save
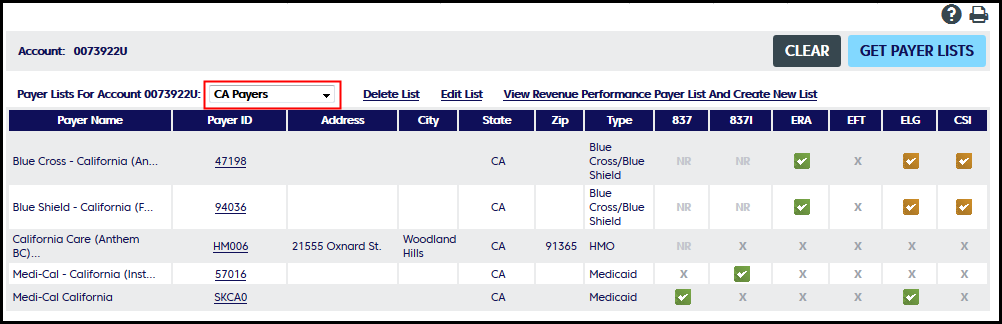
Access Custom Payer Lists
Use the drop down list to access your custom payer list.
Click on the Payer ID to view enrollment requirements.
Options are Delete, Edit, or Create New
Caution - Delete List removes the active list immediately.
Use this guide to determine which payers do, or do not, need enrollment.

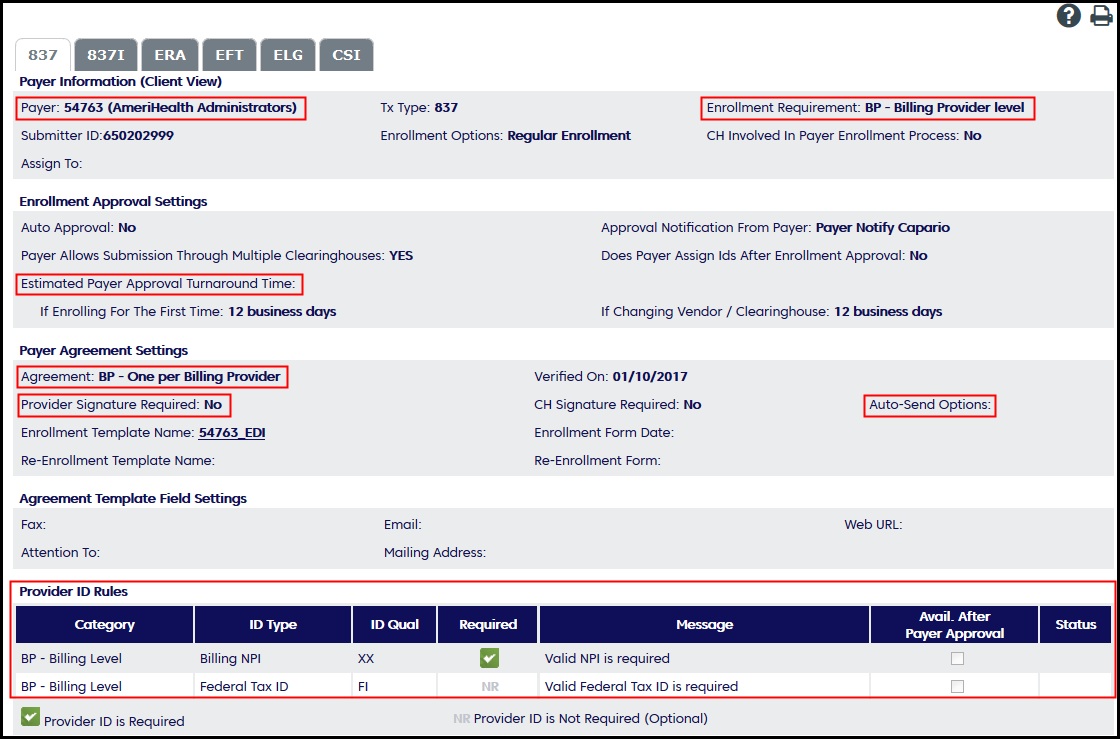
Enrollment Requirements
The enrollment requirements are shown here, for each transaction type. Click on any transaction tab to view enrollment details for this payer. Included in the requirements:
- Estimated Payer Approval Turnaround Time for this payer depending on whether you are enrolling for the first time or just switching vendor or clearinghouse
- Shows if enrollment is required at the Billing Provider or Rendering Provider level
- Shows if the provider signature is required
- Auto send options
- The bottom section lists any payer specific requirements
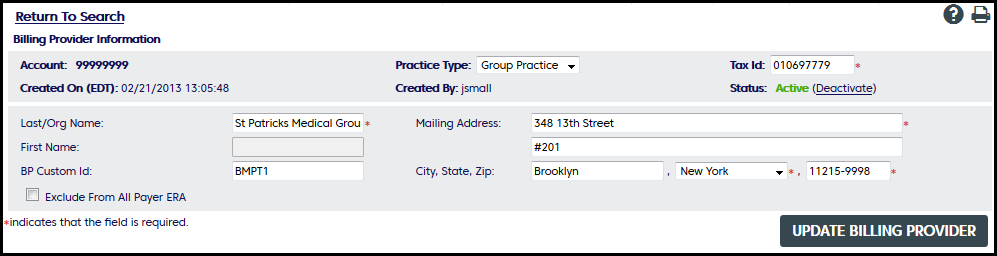
Provider Management
Use Provider Management to add or edit provider information.
Custom ID - You can assign your Custom ID to any Billing Provider, Billing Provider NPI/site, or Rendering Provider. Your Custom ID can be used for all searches in the Revenue Performance Enrollment system. In other words your Custom ID can be used instead of all the other Billing Provider or Rendering Provider IDs.
- Search for an existing Billing provider or Rendering provider
- Edit any information about Billing or Rendering providers
- Use links to edit the NPI or Tax ID.
- Add a new Billing or Rendering provider.
- Start enrollment. Check the provider and enroll using the payer list, existing enrollment or bulk enrollment spreadsheet.
To start enrollment from Providers or from the Payer List:
- Locate the provider. In this example we searched for Baymiller.
- Select the provider using check box and click on Enroll - Payer List
- Select Payer(s) and Transaction(s)
- Review for missing Information. Some payers require additional payer-specific IDs.
- Finish (Go to Print queue)
More about Enrollment workflow
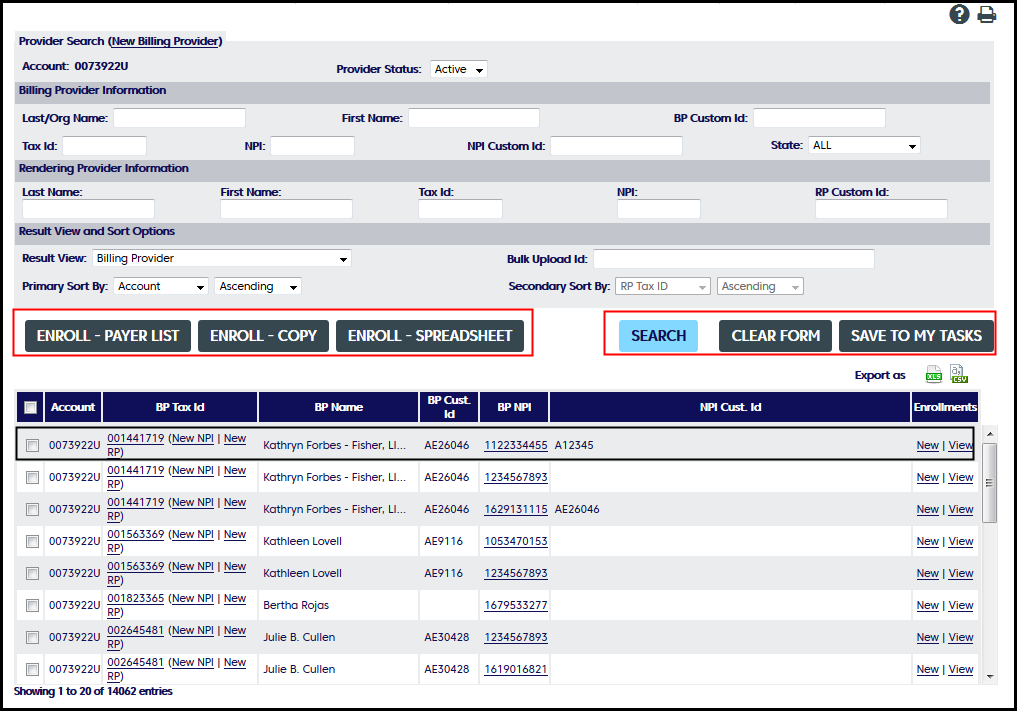
Search Results
Each highlighted link offers a new screen to to edit, add or view

BP = Billing Provider
RP = Rendering Provider
BP Tax ID
- Edit any information for a Billing Provider
- View enrollment contacts and set default contact
- View,deactivate, or add new Billing Provider NPI
- View or add new Rendering Providers
- View history for this Billing Provider
(New NPI)
- Opens the NPI screen from the main Billing Provider screen
- Add Billing Provider NPI
- Billing Provider may have one or more NPIs, sites, departments, or locations
- Opens Billing Provider NPI entry screen with Billing Provider tax ID pre filled
(New RP)
- Opens the Rendering Provider entry screen from the main Billing Provider screen
- Enter all Rendering Provider information
BP NPI
- Edit Billing Provider NPI
- Add Billing Provider Taxonomy code
- Add Payer specific IDs (PTAN or UPIN)
- Shows available Rendering Providers with ability to assign them to the Billing Provider NPI. Uses arrows to assign or remove.
- View enrollment contacts and set default contact
View (Enrollment)
- Shows matching enrollments in the Existing Enrollment window
- Displays all enrollments for the provider
- caution- Billing Provider level enrollments will not be shown for Rendering Provider
- This example show existing enrollments for Billing Provider 030431996

Clicking on View takes you to the Existing Enrollment screen - Enrollment view

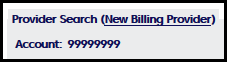
New Billing Provider
- Entry fields to add new billing provider (taxid)
- Enter information and click on: Add Billing Provider
Enrollment Workflow
The Enrollment tool offers 3 ways to start enrollment
From the Payer List:
- Locate the provider. In this example we searched for Baymiller.
- Select the provider using check box and click on Enroll - Payer List
- Select Payer(s) and Transaction(s)
- Review for missing Information. Some payers require additional IDs.
- Finish (Go to Print queue)
From Existing enrollments: From existing enrollments locate an enrollment that matches your new enrollment. Copy it and make needed changes to start enrollment.
- Click on Enroll - Copy
- From existing enrollments locate an enrollment that matches your new enrollment.
- Copy it and make needed changes to start enrollment.
- Review for missing Information. Some payers require additional payer assigned IDs.
- Finish (Go to Print queue)
From Bulk Upload: Use the Bulk upload enrollment spreadsheet to enter provider, payer and transactions then upload to the enrollment system.


From the Payer List select the Payer and the transaction type.
To locate your payer use the entry search fields at the top or use a custom payer list.

Review Enrollment information
- Incomplete tab: Lists enrollments that are missing some required information. Usually payer-specific IDs.
- Ready tab: Lists enrollments that are complete and ready to be enrolled.
- Existing tab: Lists enrollments that are in process. Approved or Pending

Ready tab
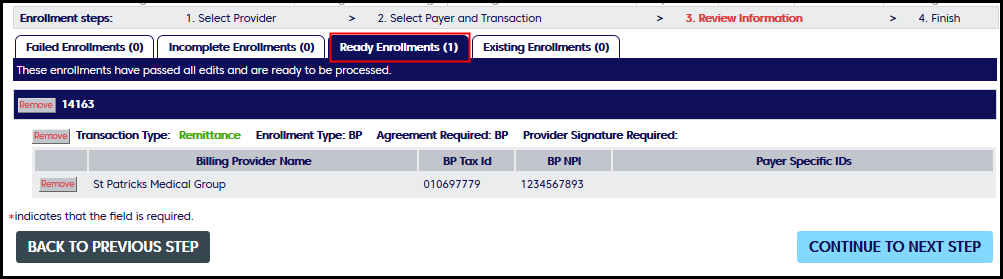
Review Agreements then go to the print queue

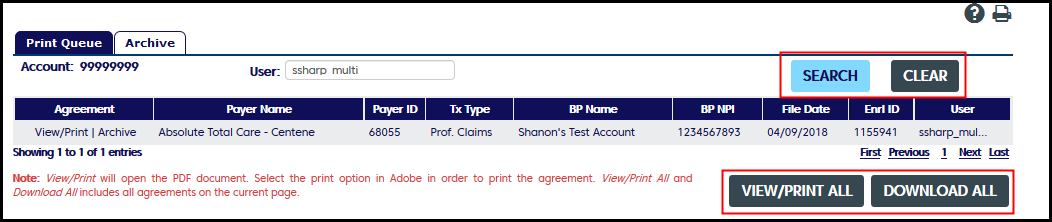
Print Queue
From the Print Queue you can View, Print, Download, and Archive agreements
- Print All/View All will produce a PDF that can be saved or printed
- View agreements will auto move to archive
- Archived agreements can be reprinted or deleted
- A master copy is always kept with the enrollment
- Additional controls to view or print all agreements. This opens a pdf and all agreements are appended to print or download
Existing Enrollments
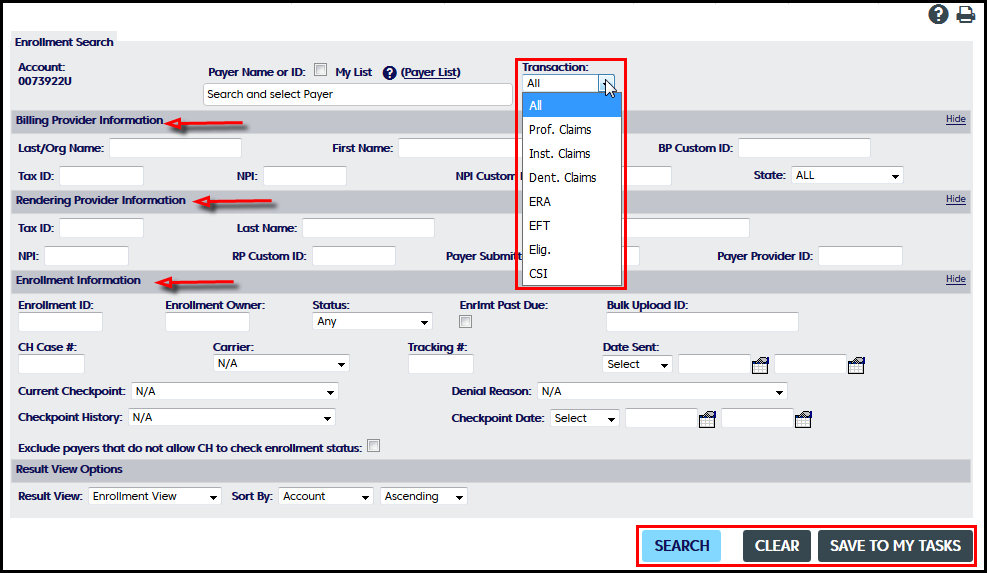
Use Existing Enrollments to locate and manage enrollments
Use the top section to conduct global searches based on Account Number, Payer ID and Transaction Type
You can also search based on Billing Provider, Rendering Provider, or Enrollment Information.
Most of the search fields in Enrollment Information are self explanatory.
- Enrollment ID - Each enrollment has a unique ID
- Enrollment Owner - Person who entered enrollment information
- Approval Owner - Person responsible for follow up with the payer for approval status
To enroll from Existing enrollments: From existing enrollments locate an enrollment that matches your new enrollment. Copy it and make needed changes to start enrollment.
- Click on Enroll - Copy
- From existing enrollments locate an enrollment that matches your new enrollment.
- Copy it and make needed changes to start enrollment.
- Review for missing Information. Some payers require additional payer assigned IDs.
- Finish (Go to Print queue)
Enrollment View Search Results
As shown this view includes BP, Checkpoint and status.
Click on Enrollment ID to view and manage this enrollment.

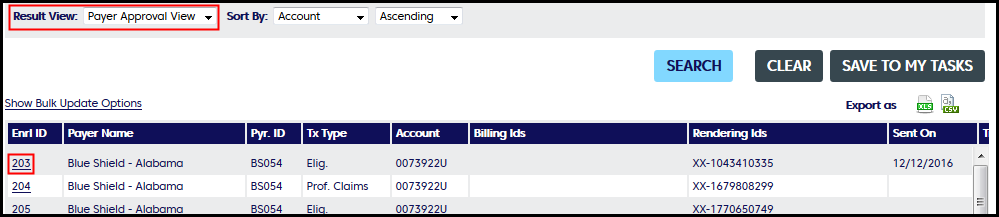
Payer Approval View Search Results
This view is used by Clearinghouse for follow up with payers for aging enrollments
This view includes details about the progress of this enrollment.
Click on Enrollment ID to view and manage this enrollment.
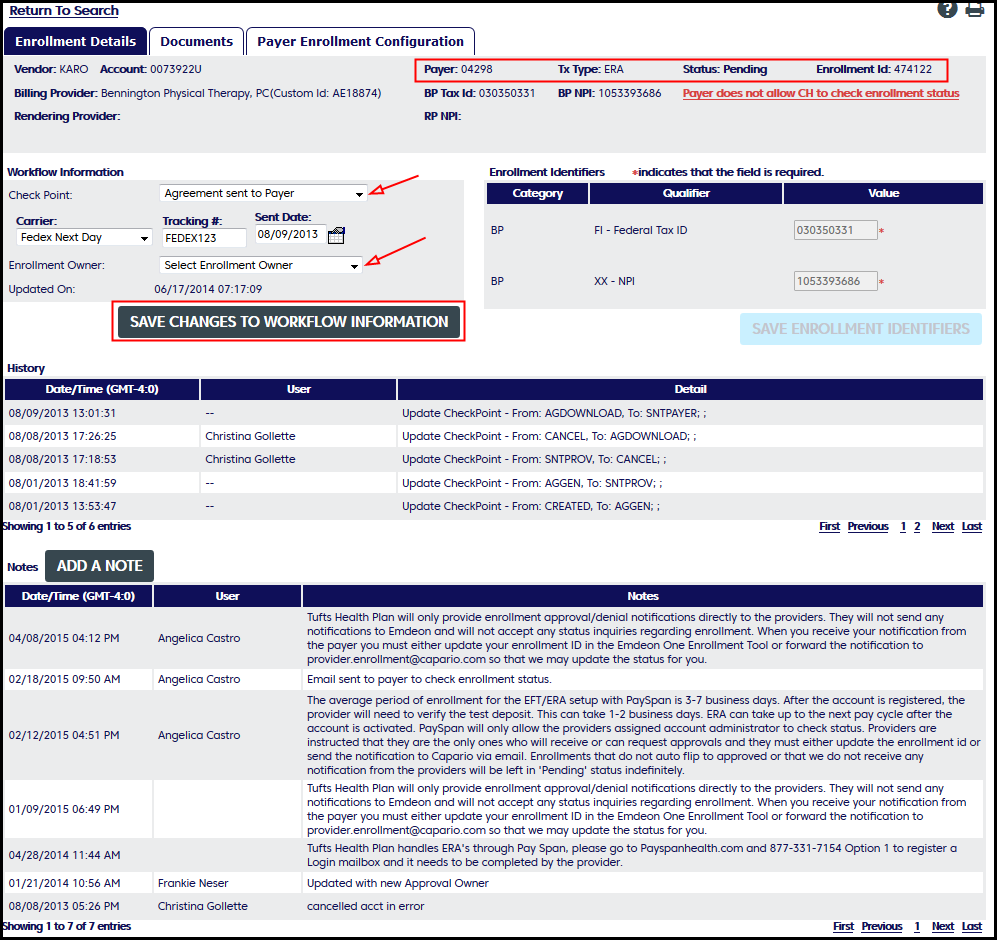
Enrollment Details
In this tab the user can view details about this enrollment and update checkpoints, tracking information and assign Enrollment Owner.
Checkpoints are used to track the progress of enrollment start to finish
History and Notes for this enrollment are shown at the bottom
The Payer Configuration tab - For Clearinghouse Use - will appear in your enrollment tool.
Users can not update.
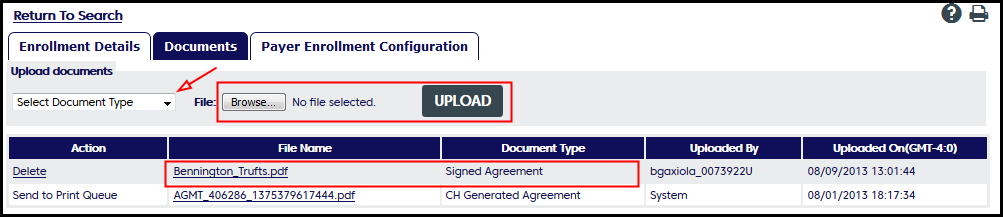
Documents
To add a document to this enrollment - Select document type from the drop down list. Browse to the document then upload.

Bulk Uploads
From Bulk Uploads you can:
- Upload your providers to the Enrollment tool.
- Upload your providers and payer information to the Enrollment tool, to start enrollment.
- Search for past uploads.
Upload Spreadsheets
Both spreadsheets have an instruction tab.
The Provider Spreadsheet Template is used to add providers to the enrollment tool.
- This is NOT used to start enrollment or for maintenance on providers already in the Enrollment system
- Open the template and save it to your system
- Enter provider information and upload - Upload New Spreadsheet
The Enrollment Spreadsheet Template is used to start enrollment
- Open the template and save it to your system
- Enter provider information, payer information, transaction type, etc.and upload - Upload New Spreadsheet
- If the provider IDs are in the enrollment system you can just use your Custom ID instead of including all the provider information or provider IDs.
Search Bulk Enrollments
Enter Search criteria: Date Range, Upload Type,Upload Status, File Name, File ID
Press Search